
Getting Started with Java
Welcome to the first lesson of the InnoMarts Java course. ☕
Before we start writing real Java programs, we need to prepare the tools that will help us write, compile, run, and debug Java code.
By the end of this lesson, you will have:
- Java 25 LTS installed;
- IntelliJ IDEA installed;
- a working Java development environment;
- your first Java project ready for the next lesson.
No complicated programming yet.
Today we are preparing the workshop before we start building things.
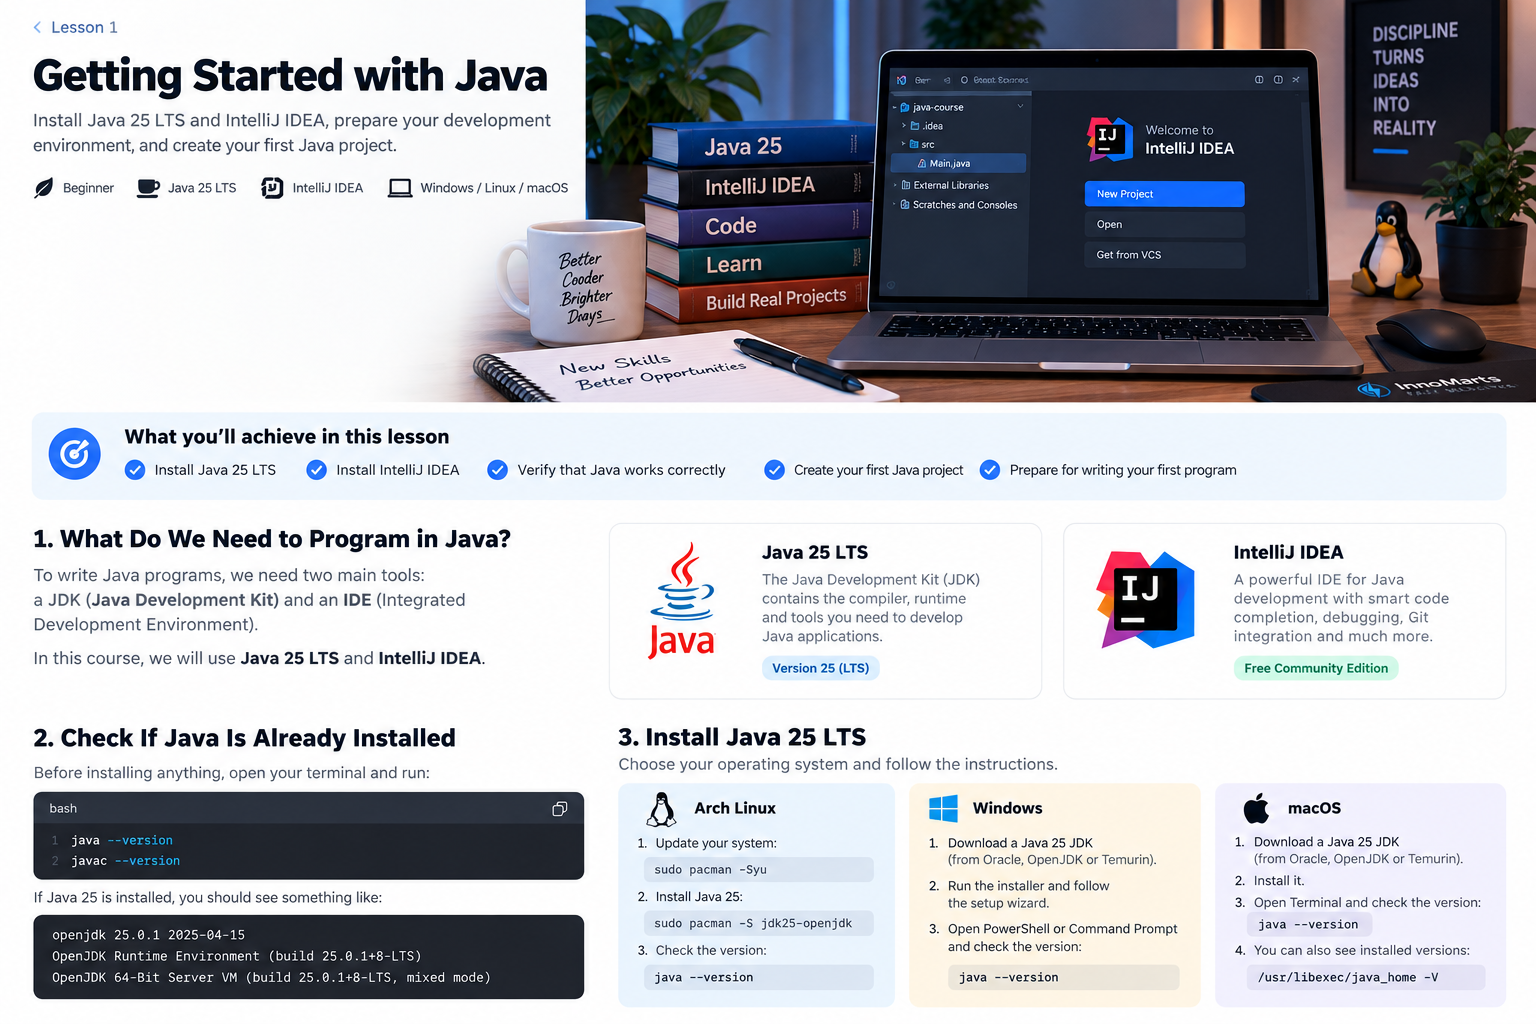
What Do We Need to Program in Java?
To develop Java applications, we need two main tools:
- JDK — Java Development Kit
- IDE — Integrated Development Environment
For this course, we will use:
- Java 25 LTS
- IntelliJ IDEA
Let's see what each one does.
☕ What Is the JDK?
The JDK, or Java Development Kit, contains the tools needed to develop Java applications.
It includes:
- the Java compiler;
- the Java runtime;
- development tools;
- the standard Java libraries.
In simple terms:
The JDK gives your computer the tools needed to understand and run Java programs.
Without a JDK, you can write Java code...
but your computer will mostly stare at it politely. 😄
JDK, JVM, and JRE
You will see these abbreviations many times while learning Java.
Don't worry about memorizing every detail now.
For the moment, this is enough.
JDK
Java Development Kit
Used to develop Java applications.
It includes the Java compiler and other development tools.
JVM
Java Virtual Machine
Runs compiled Java programs.
JRE
Java Runtime Environment
Traditionally, the JRE provided the environment required to run Java applications.
For this course, we will install the complete JDK, because we want to develop Java programs, not only run them.
A simplified Java workflow looks like this:
Java source code
        ↓
     Compiler
        ↓
     Bytecode
        ↓
       JVM
        ↓
 Program running
We will explore this process properly in Lesson 3.
For now, remember:
We install the JDK because we want to write and develop Java applications.
🔎 Check Whether Java Is Already Installed
Before installing anything, open a terminal.
Run:
java --version
Then check whether the Java compiler is available:
javac --version
If Java 25 is installed, you should see output containing something similar to:
openjdk 25
and:
javac 25
Your exact version may contain additional numbers, for example:
25.0.2
That's perfectly normal.
If your terminal says that the command does not exist, Java probably needs to be installed.
🐧 Installing Java on Arch Linux
If you're using Arch Linux, installation is straightforward.
First, update the system:
sudo pacman -Syu
Then install Java 25:
sudo pacman -S jdk25-openjdk
After installation, verify Java:
java --version
Then check the compiler:
javac --version
If both commands show Java 25, your JDK is ready.
Managing Multiple Java Versions on Arch Linux
You can have several Java versions installed at the same time.
For example:
Java 21
Java 25
Arch Linux provides a convenient tool for managing them.
Run:
archlinux-java status
You may see something similar to:
Available Java environments:
  java-21-openjdk
  java-25-openjdk (default)
If Java 25 is installed but another version is selected, run:
sudo archlinux-java set java-25-openjdk
Check again:
archlinux-java status
And finally:
java --version
If Java 25 is displayed, everything is ready.
🪟 Installing Java on Windows
On Windows, install a Java 25 JDK from a trusted Java distribution.
Common choices include:
- Oracle JDK;
- OpenJDK;
- Eclipse Temurin.
Download the installer for your system and complete the installation.
Afterward, open:
PowerShell
or:
Command Prompt
Run:
java --version
Then:
javac --version
If both commands display Java 25, the installation works.
If Windows Cannot Find Java
You may see an error similar to:
'java' is not recognized as an internal or external command
This usually means Windows cannot find the Java installation.
The JDK's bin directory needs to be available through the system PATH.
A typical Java installation might be located at:
C:\Program Files\Java\jdk-25\bin
Your exact path may be different.
Many modern JDK installers configure this automatically.
🍎 Installing Java on macOS
On macOS, install a Java 25 JDK from a trusted Java distribution.
After installation, open Terminal.
Run:
java --version
Then:
javac --version
You can also ask macOS which Java installations it knows about:
/usr/libexec/java_home -V
If Java 25 appears in the list, you're ready.
💡 IntelliJ IDEA Can Download the JDK for You
There is another convenient option.
When creating a Java project, IntelliJ IDEA can often download and configure the JDK automatically.
You may see:
Download JDK
Choose:
Java 25
and let IntelliJ configure it.
This can be especially convenient for beginners on Windows and macOS.
On Linux, especially Arch Linux, installing Java through the system package manager is often a cleaner approach because the operating system manages the Java installation directly.
🧠 What Is an IDE?
An IDE, or Integrated Development Environment, is an application designed to help developers write software.
Technically, you could write Java using:
Nano
Vim
Notepad
But an IDE gives you many useful tools in one place.
For example:
- syntax highlighting;
- automatic code completion;
- error detection;
- project navigation;
- code refactoring;
- debugging;
- Git integration;
- Maven integration.
For this course, we will use IntelliJ IDEA.
💻 Why IntelliJ IDEA?
IntelliJ IDEA is very well suited to Java development.
It understands Java code and helps detect many mistakes while you type.
Throughout this course, we will use IntelliJ IDEA for:
- writing Java code;
- running applications;
- debugging;
- navigating projects;
- working with Maven;
- writing tests;
- using Git.
The core Java development functionality is available without buying a paid subscription, so it is a good choice for beginners as well.
📥 Installing IntelliJ IDEA
Download IntelliJ IDEA from the official JetBrains website.
Choose your operating system:
Windows
macOS
Linux
Install it normally.
During the first launch, IntelliJ may ask you about:
- importing previous settings;
- choosing a theme;
- installing plugins;
- signing into a JetBrains account.
For now, the default settings are perfectly fine.
We can customize everything later.
🐧 IntelliJ IDEA on Arch Linux
On Arch Linux, you have several ways to install IntelliJ IDEA.
If IntelliJ IDEA is already installed, there is no reason to reinstall it.
The important thing is simply that the IDE starts correctly and can create Java projects.
🏗 Creating Your First Java Project
Open IntelliJ IDEA.
From the welcome screen, select:
New Project
Choose:
Java
You should see a field for the JDK.
Choose:
Java 25
If Java 25 does not appear, IntelliJ may offer:
Add JDK
or:
Download JDK
Choose your Java 25 installation.
Choose a Project Name
Let's call our project:
java-course
On Linux or macOS, you might store it somewhere such as:
~/Projects/java-course
On Windows:
C:\Users\YourName\Projects\java-course
The exact location is not important.
The important thing is that you know where your project lives.
📁 Understanding the Project Structure
After creating the project, IntelliJ IDEA opens its main window.
Depending on your IntelliJ version and project configuration, you may see something similar to:
java-course
├── .idea
└── src
For now, the most important directory is:
src
src means:
source
This is where our Java source code will live.
The .idea directory contains IntelliJ IDEA project settings.
Normally, you do not need to edit those files manually.
✅ Check the Project JDK
Before continuing, make sure IntelliJ is actually using Java 25.
Open the project settings and look for:
Project SDK
or:
Project JDK
It should display something similar to:
Java 25
or:
OpenJDK 25
If so, everything is configured correctly.
🧪 Verify Your Development Environment
Let's make sure everything is ready.
Your terminal should successfully run:
java --version
and:
javac --version
IntelliJ IDEA should also show Java 25 as the project's JDK.
So our checklist now looks like this:
[✓] Java 25 installed
[✓] javac available
[✓] IntelliJ IDEA installed
[✓] Java 25 configured in IntelliJ
[✓] Java project created
If all five are true, you're ready to start programming.
🎯 Small Challenge
Before moving to Lesson 2, explore IntelliJ IDEA and find:
- The Project panel.
- The
srcdirectory. - The configured JDK.
- The built-in terminal.
- The Settings or Preferences window.
You don't need to change anything.
Just look around.
Developers learn a surprising amount by pressing buttons and seeing what happens.
Preferably not the button named:
Delete Project
😄
⚠️ Common Problems
java: command not found
Java is either not installed or your terminal cannot find it.
On Arch Linux, check:
archlinux-java status
javac: command not found
You may have installed only a Java runtime instead of the full development kit.
Make sure you installed a JDK.
IntelliJ Cannot Find Java
Open your project settings and manually select the installed JDK.
Alternatively, use IntelliJ's:
Download JDK
option.
IntelliJ Uses the Wrong Java Version
You may have several Java versions installed:
Java 17
Java 21
Java 25
That is completely normal.
The operating system's default Java version and IntelliJ's project JDK can even be different.
For this course, make sure the project itself uses:
Java 25
🎓 What You Learned
In this lesson, you learned:
- what the JDK is;
- what the JVM is;
- what the JRE means;
- why Java developers need a JDK;
- how to check your installed Java version;
- how to install Java 25;
- how to manage Java versions on Arch Linux;
- what an IDE is;
- why we use IntelliJ IDEA;
- how to create your first Java project;
- how to configure the project's JDK.
Your computer is now ready for Java development.
But we still haven't really programmed anything.
That changes next. ☕
Next Lesson
In Lesson 2, we will create our first Java class and finally write:
public class Main {

    public static void main(String[] args) {
        System.out.println("Hello, InnoMarts!");
    }

}
But we won't just copy it.
We'll begin understanding what all those mysterious words actually mean.